In-ground instant hedge installation guide
Living Walls™ are fully formed instant hedges, supplied in one-metre lengths and installed together to create a continuous hedge from day one.
This guide covers installing Living Walls™ directly into the ground, where roots can grow freely.
Before installation begins, make sure the person installing your hedge has read this guide, particularly the drainage, trench depth and spacing instructions. You may also like to view our installation video.
After installation, follow our care and maintenance guide for ongoing watering, feeding, trimming and general care.
For installation in containers, raised planters, planter boxes, some retaining walls and other restricted-root planting spaces, see our container and planter box installation guide.
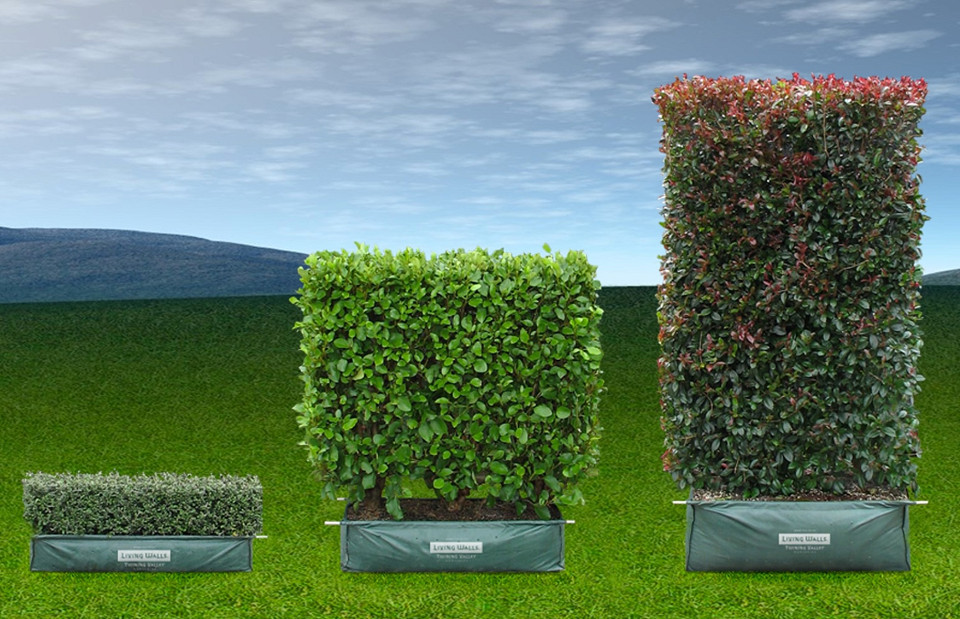
Diagram: Hedge bag sizes – 25L, 70L and 100L
Site preparation
- Plan ahead: Before your hedge arrives, mark out the hedge line, check for underground services or other obstacles and test the drainage. Once you know the site conditions and required installation depth, prepare the trench. For new builds, consider doing the excavation while machinery is still on site.
- Check drainage before digging the trench: Drainage can vary along the hedge line, so check it at several points, particularly in low areas, heavy clay soil, areas with a high water table, or anywhere water tends to pool after rain. Dig test holes along the intended hedge line and follow our How to check and improve drainage guide to assess the site. If drainage is poor, improve it before installation. Follow the WET HEAVY SOIL installation detail below where appropriate, or consider a fully raised planting area as explained in the drainage guide.
- Backfill soil: Ideally, use the soil excavated from the trench. This keeps conditions consistent with the surrounding ground as roots grow out into it and avoids creating a pocket of different soil that can affect how water moves through the planting area. If you’ve removed large plants or roots or otherwise don’t have enough soil to backfill, bring in good-quality topsoil.
- Root control: For vigorous-rooted varieties such as Ficus tuffi, consider installing a 600–900 mm deep root barrier where roots need to be kept away from pipes, paths or other structures. Install the barrier before placing the hedge.
Preparing your trench
Standard trench dimensions
- 25L hedge bag: 250 mm wide × 150 mm deep × total hedge length
- 70L hedge bag: 400 mm wide × 250 mm deep × total hedge length
- 100L hedge bag: 500 mm wide × 300 mm deep × total hedge length
Installation depth adjustments
- Well-drained soil: Dig to the standard trench dimensions for your hedge bag size. Set the top of the rootball level with the surrounding ground.
- Heavy clay soil, wet sites or high water tables: If the site has persistent waterlogging or a high water table, seek drainage advice before installation. Raised planting does not resolve persistent waterlogging by itself.
Dig the trench about one-third shallower than the standard depth shown above, so the rootball sits about one-third above the surrounding ground level. For example, dig to about 170 mm deep for 70L hedge bags and 200 mm deep for 100L hedge bags.
Cover the exposed sides of the rootball with soil, sloping it down to the surrounding ground. Keep soil off the top of the rootball and away from the plant trunks. See the WET HEAVY SOIL diagram.
- Light sandy soil or when installing your hedge across the top of a steep site: Dig the trench about 50 mm deeper than the standard depth. The top of the rootball will sit about 50 mm below the surrounding ground level. Keep soil away from the plant trunks. Cover the top of the rootball with mulch after installation. See the DRY SANDY SOIL diagram.
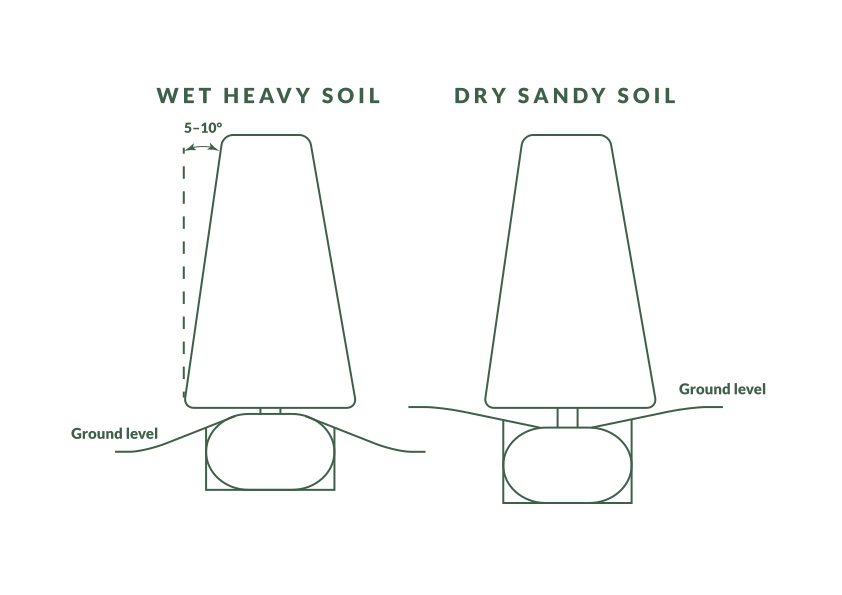
Diagram: Installation depth for wet/heavy and dry/sandy sites. End view showing the hedge, rootball, trench and surrounding ground level.
Dig and prepare the trench
- Dig the trench to the depth and width established above.
- Set aside enough soil for backfilling.
- Loosen any compacted soil at the bottom and sides of the trench with a spade. This allows roots to grow into the surrounding soil.
- If you need to add soil beneath a rootball to adjust its height, firm that soil before placing the hedge so it does not settle after installation.
- Don't add extras such as gravel, compost, manure, water crystals or fertiliser to the trench. Gravel can worsen drainage problems. Compost and manure break down over time, which can cause the hedge to sink, and may be too rich for new roots. Fertiliser can damage roots at this stage, so apply it on top later.
Handling your hedge
- Lift using both handles. Avoid pulling or dragging hedge bags, as this can tear them. Wear gloves, as the fibreglass rods can be rough on skin.
- 100L hedge bags can weigh over 100 kg when wet. Allow two to four capable people to carry them, or mechanical assistance to move them around the site.
- 70L hedge bags, at around 65 kg each, require two capable people to carry.
- 25L hedge bags, at around 25 kg, can generally be carried by one capable person.
Installing your hedge
Place the hedges beside the trench with the logos facing the same way. If the bags are numbered, line them up from left to right in order.
1. REMOVE THE BAG AND POSITION THE HEDGE
Cut open the square ends of each bag with a Stanley knife or similar cutting tool. Check that the bag comes away freely, gently freeing any roots attached to it or growing through the drainage holes.
Remove the bag completely, then support the hedge by the rootball or trunks and gently lower it into position.
Alternatively, use the bag as a sling. Where you can access both sides of the trench, you can use the bag as a sling to help place the hedge:
- Lift the hedge into position using both handles, with the bag supporting the rootball from beneath.
- Once the rootball is resting in position, remove the handle furthest from you from its sleeve.
- Hold the handle closest to you. Gently tilt or lift the hedge slightly while pulling the bag out from beneath the rootball.
Do not kick or roughly handle the rootball.
2. SPACE THE HEDGES
Each hedge rootball is approximately 900 mm long, while the foliage extends to about 1 metre. Set the rootballs about 100 mm (10 cm) apart, allowing one hedge length per linear metre of finished hedge. The bag handle is 1 metre long and can be used as a reference. See the rootball spacing diagram below.
The foliage should meet. The rootballs should not.
Fit your space: If the trench length varies slightly from an exact number of metres, adjust the gaps between rootballs evenly to fit the available space.
Cut the rootball only if necessary: If you need a shorter hedge length, for example to fill a half-metre gap, saw through the rootball between plants using a toothed tool. Keep as much of the rootball intact as possible. Do not use a spade.
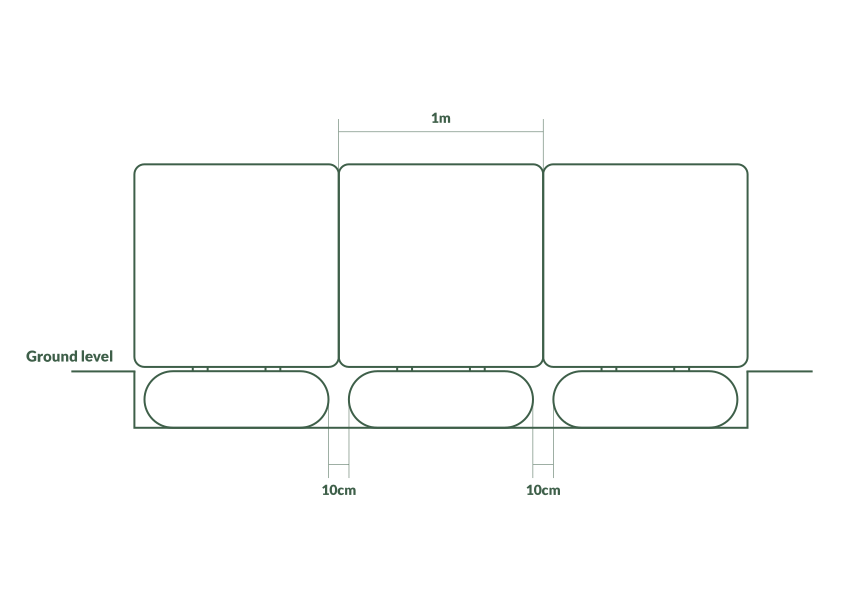
Diagram: Rootball spacing – approximately 100 mm (10 cm) between rootballs. The foliage should meet; the rootballs should not. View along the hedge length.
3. Backfill and water
Once your hedges are upright, level and evenly spaced, start backfilling:
- Fill around and between the rootballs with the soil you set aside to about halfway up their sides, packing it gently but firmly. Do not over-compact.
- Water lightly to settle the soil.
- Finish backfilling. For raised installations, cover the exposed sides of the rootball with soil, sloping it down to the surrounding ground as shown in the WET HEAVY SOIL diagram. Keep soil off the top of the rootball and away from the plant trunks. For sandy soil installations, keep soil off the top of the rootball and cover it with mulch after installation.
- Water thoroughly, applying approximately 10–20 litres per metre, depending on hedge size. Apply it slowly so it soaks into the rootballs and surrounding soil.
After installation
- Staking: Generally not required. In windy exposed sites, add temporary support if needed. Place stakes, such as Waratahs, on the sheltered side of the hedge and run horizontal wire between them to support the hedge. Reducing the hedge height slightly can also reduce wind strain. See Do I need to stake my Living Walls™ hedge? for more information.
- Watering arrangements: We recommend and supply flow-regulated landscape drip line for in-ground Living Walls™ hedges. Your hedge will need regular, deep watering while it establishes. You may rely on regular hand watering for a short hedge run. Whichever method you use, make sure water reaches every rootball. See Water for ongoing watering guidelines.
- Feeding: Feed in early spring and again in mid-summer using a complete granular NPK fertiliser, following the product directions. Spread it evenly over the rootball area, keep it away from trunks and foliage, and water it in. Do not mix fertiliser into the trench at installation. See Feeding and mulching for ongoing guidance.
- Mulching: Apply mulch over the root zone to help retain moisture and suppress weeds. Keep it clear of trunks and lower stems. Do not use fresh grass clippings. Refresh the mulch as needed, particularly after feeding in spring. See Feeding and mulching for guidance.
- Trimming: Give your hedge a light trim after installation if needed to even up the shape. See our trimming guide for ongoing care.
Care and maintenance
For ongoing care, read and follow our care and maintenance guide.