Living Walls™ are fully formed instant hedges, supplied in one-metre lengths and installed together to create a continuous hedge from day one.
This guide covers choosing, preparing and planting enclosed containers and open-bottom planters.
Read the planning and preparation sections before buying or building your planter. Make sure whoever is installing your hedge reads this guide before installation begins and follows the instructions throughout.
Choose a variety suited to the location, including sun or shade, wind exposure and coastal conditions, and to the height you want to maintain.
Both enclosed containers and open-bottom planters limit the space available for roots. Some varieties cope better with this than others. See our recommended container varieties, and allow as much root space as practical when choosing or designing your planter.
Plan your watering arrangements before installation so every rootball receives reliable watering. For a short hedge run or a few containers, you may rely on regular hand watering. For irrigation options, see After installation below.
Living Walls™ rootballs are approximately 900 mm long. The following are the minimum internal container sizes we recommend for each hedge bag size:
For multiple hedge lengths, allow one linear metre of finished hedge per length. See the spacing and cross-bracing guidance below.
Drainage: Containers need adequate drainage holes so excess water can escape freely. Make sure the holes will remain unobstructed when the container is in position.
Materials: In hot, north-facing positions, avoid thin steel or dark plastic containers that can heat up significantly. More insulated materials such as concrete, sandstone, terracotta or timber are generally better choices.
Open-bottom planters can provide extra height or a raised planting area where direct in-ground installation is difficult.
Root space: Allow as much internal width and soil depth as practical, with room for soil beneath and around the rootball. An open bottom may allow roots to grow into suitable soil below, but the planter walls still limit sideways growth.
Check drainage before filling the planter: Check the ground beneath the proposed planter, particularly in low areas, heavy clay, compacted ground or anywhere water pools after rain. For longer planter runs, check at several points. Follow our How to check and improve drainage guide.
Excess water must be able to drain into the ground below or escape through another suitable drainage route. An open bottom alone will not solve poor drainage. If the hedge is being raised above wet or unsuitable ground, the planter must provide sufficient suitable soil above that ground and allow excess water to drain away. See the fully raised installation section of the drainage guide.
For multi-metre containers and open-bottom planters, position internal cross-bracing in the gaps between rootballs so it does not interrupt a rootball.
Plan bracing at full-metre intervals, for example every 1 m, 2 m or 3 m, aligned with the gaps shown in the diagram. Bracing must fit within the approximately 100 mm gap. Allow for its actual position and thickness when planning the internal layout.
The foliage should meet. The rootballs should not.
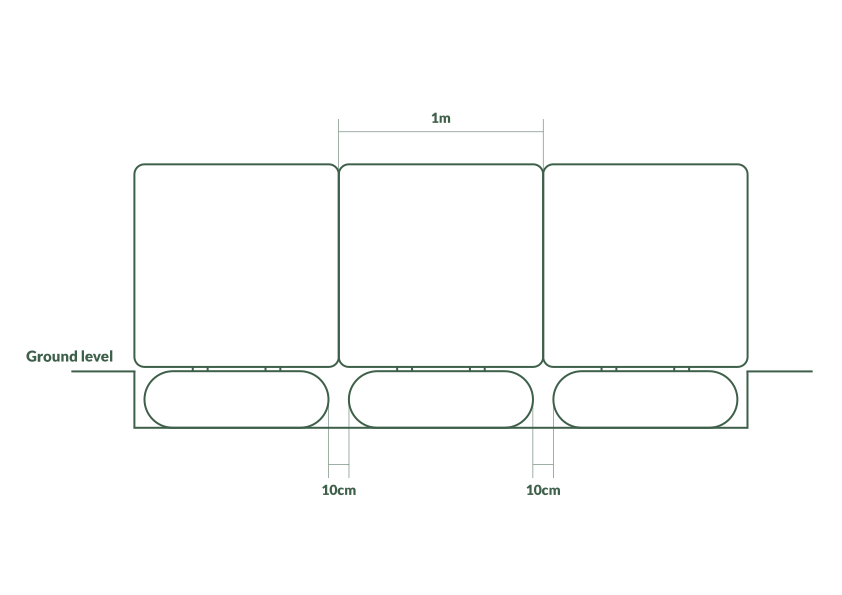
Diagram: Rootballs spaced approximately 100 mm (10 cm) apart, with foliage meeting above the gaps.
Use a quality container mix under and around the rootball.
Do not add gravel, compost, manure, water crystals or fertiliser to the mix. Container mixes may already contain nutrients or moisture-retaining additives, which is fine. For ongoing feeding, see After installation below.
Use free-draining garden mix or good-quality topsoil under and around the rootball. Complete any necessary drainage improvements before filling the planter.
Do not add gravel, compost, manure, water crystals or fertiliser as separate additions. These can interfere with drainage, break down over time or be too rich for new roots. For ongoing feeding, see After installation below.
Measure the internal dimensions of the space you intend to fill:
Length × width × filling depth in metres = cubic metres (m³)
Cubic metres × 1,000 = litres
Use the planned filling depth rather than the full container height if you are leaving space at the top for watering and mulch.
For example, a space measuring 1.0 m × 0.4 m × 0.4 m holds 0.16 m³, or 160 L.
Subtract the approximate rootball volume:
160 L − 70L rootball = approximately 90 L of mix.
For multiple hedge lengths, subtract the combined rootball volumes. This is an estimate, as rootball sizes and the amount of settling will vary.
Place the hedges beside the planter with the logos facing the same way. If the bags are numbered, line them up from left to right in order.
Add enough of the appropriate mix or soil at the base of the planter to support the rootball at the correct height. Gently firm the mix or soil so the hedge does not settle lower after installation.
Cut open the square ends of each bag with a Stanley knife or similar cutting tool. Check that the bag comes away freely, gently freeing any roots attached to it or growing through the drainage holes.
If the rootball is slightly too wide: Gently rub off a small amount of potting mix from the sides where the rootball bulges. If needed, carefully wash away some mix. Keep as much of the root system intact and undamaged as possible. This is for small adjustments, rather than fitting a hedge into an undersized planter.
Remove the bag completely, then support the hedge by the rootball or trunks and gently lower it into position.
Alternatively, use the bag as a sling. Where you can access both sides of the planter, you can use the bag as a sling to help place the hedge:
Avoid kicking or roughly handling the rootball.
Keep the hedge upright and level.
For a single hedge length in one container, position it centrally.
For multiple hedge lengths, set the rootballs approximately 100 mm (10 cm) apart, allowing one hedge length per linear metre of finished hedge. The bag handle is 1 metre long and can be used as a reference.
The foliage should meet. The rootballs should not. Refer to the spacing diagram above.
If your planter length is not an exact number of metres, adjust the gaps slightly where practical to fit the available length evenly. Keep any cross-bracing within the gaps between rootballs.
Cut only if necessary: If you need a shorter hedge length, for example to fill a half-metre gap, saw through the rootball between plants using a toothed tool. Keep as much of the rootball intact as possible. Do not use a spade.
Once the hedge is upright, level and correctly spaced:
For ongoing care, read and follow our care and maintenance guide.